Sunday, January 30, 2011

Daffodil Cake.

Winter eating is heavy. There’s no way around it.

It’s hearty soups and crusty peasant bread. Thick stews and heavy biscuits. Casseroles laden with meats and sauces. Filling pies with buttery crusts. Holiday cookie after holiday cookie. Rich hot chocolate with whipped cream.

Ugh.

Last week I had the misfortune of catching a nasty stomach bug. I was limited to days of drinking coke and eating popsicles and oyster crackers. At first I was devastated that I couldn’t indulge in my afternoon pillage of the cracker jar or nightly rummage through my candy tin. However, as my appetite returned, I didn’t turn to my usual snacking culprits. I even grabbed a piece of fruit one night over a chocolate bar and tin of cashew nuts. A few days away from the over-salted snacks and sugary sweets curbed my cravings and made me feel so much better.

This inspired me to lighten things up a bit.

But not too much, as what’s life without cake?

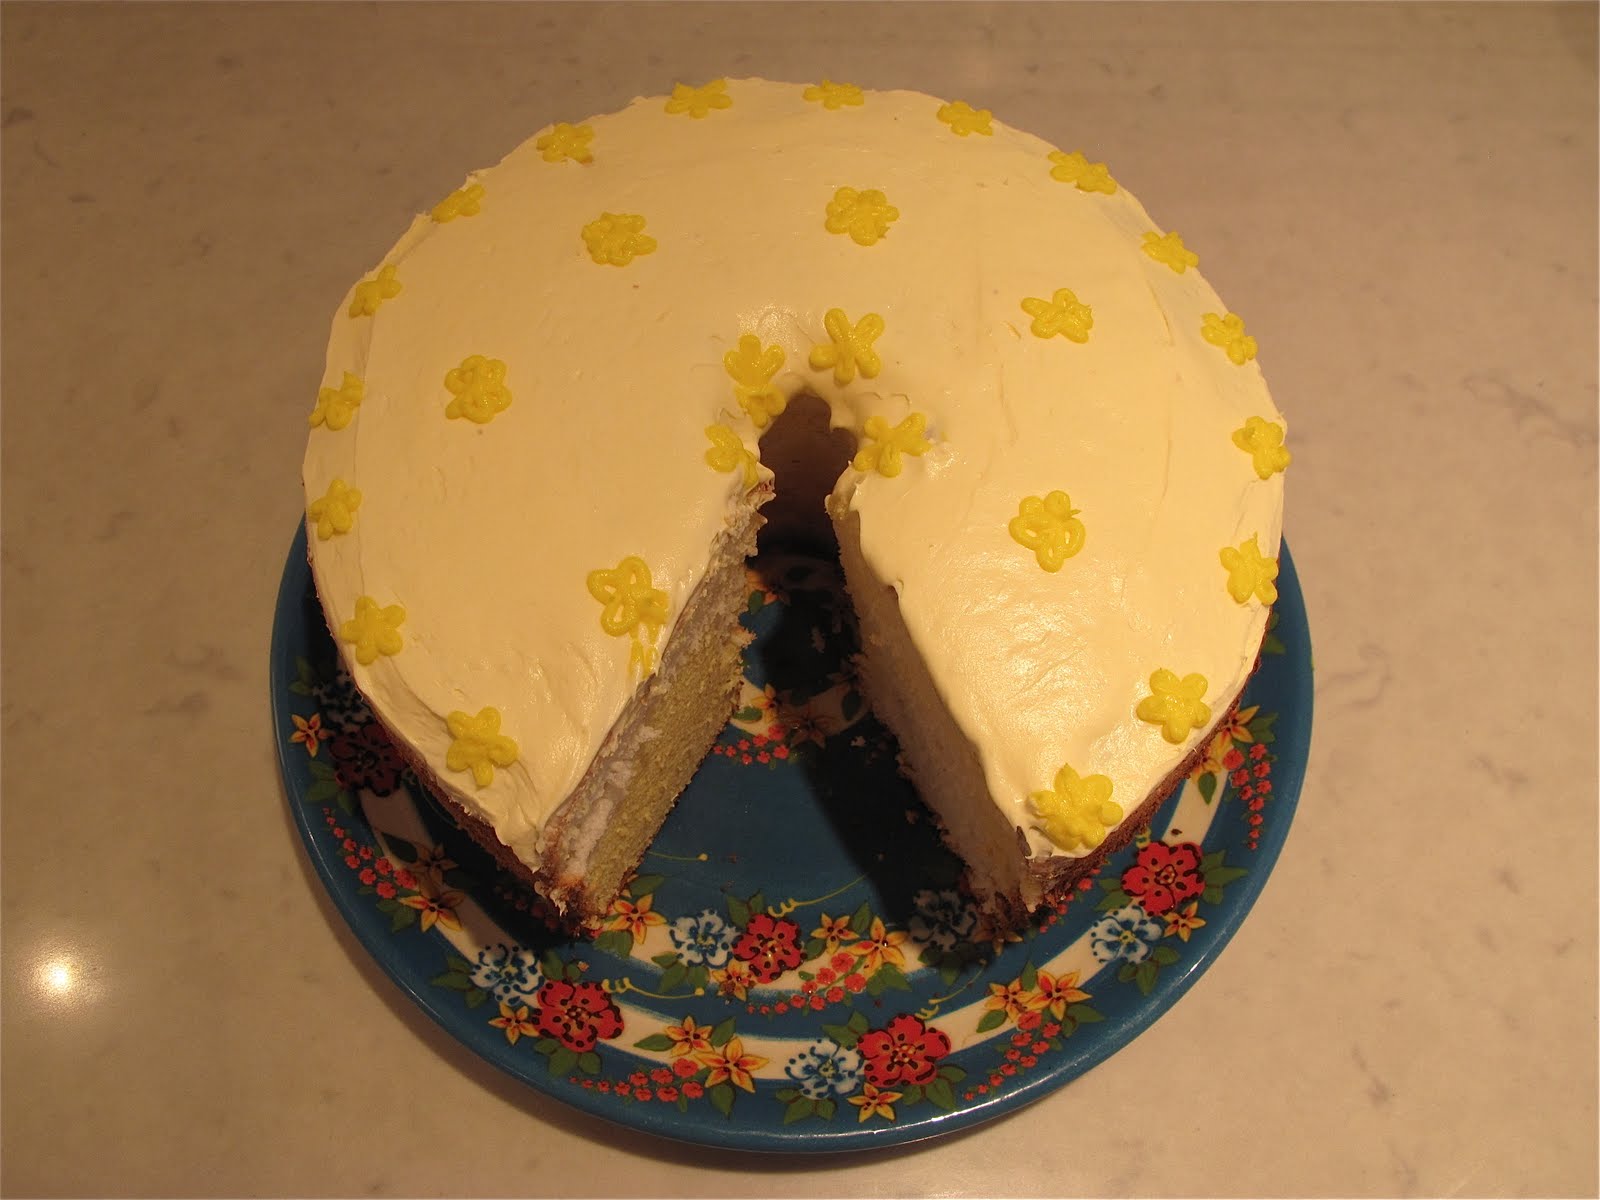
I bring you Daffodil Cake. This cake is made with no butter and contains mostly whipped egg whites. I like to think of it as a protein shake masquerading as cake (or at least that’s how I justify eating more than one slice). It’s lemony and light, a definite sigh of relief after the pumpkin pies of thanksgiving and fruitcakes of Christmas.


It’s also a much needed reminder that spring is lurking somewhere around the corner. There’s just February and March to get through. So while we’re all waiting for the heaps of snow to melt, let’s just stay inside and eat cake!

Daffodil Cake.
Recipe Adapted from McCalls Cooking School by Mary Eckley (Food Editor) and Mary J. Norton (Associate Food Editor)


White Batter:
1 ¾ cups egg whites (12-14 eggs) at room temp
1 ¼ cups cake flour, sifted before measuring
1 ½ cups sugar
½ teaspoon salt
1 ½ teaspoons cream of tartar
1 ½ teaspoons vanilla

Yellow Batter:
5 egg yolks
2 tablespoons cake flour
2 tablespoons sugar
grated zest of two lemons
1 teaspoon freshly squeezed lemon juice

To make the white batter:
1. Sift the cake flour with ½ cup sugar three times.


2. Place the egg whites, salt and cream of tartar in the bowl of an electric mixer. Whip on high until soft peaks form. Add one cup of sugar, ¼ cup at a time. Be sure to slow the mixer to a low speed when pouring in the sugar or else the sugar will fly out. Continue beating until stiff peaks form.


3. Fold the vanilla into the egg white mixture with a spatula.


4. Add the flour mixture the egg whites in three parts to. Do this by sifting the flour over the egg whites, then folding with a spatula carefully to avoid deflating the whites. Repeat until all the flour has been added.

5. Place one third of the egg white mixture in a separate bowl, and preheat the oven to 375 F.

To make the yellow batter:
1. Place the egg yolks, sugar and flour in a bowl and whisk until thick and pale yellow. Add the lemon zest and juice and mix until incorporated.

2. Carefully fold the yellow batter into the reserved 1/3 of the egg white mixture.

To assemble and bake the cake:
1. Place the batters alternatively in a 10-inch tube pan, ending with all white batter on the top. Spread the top smooth with an offset spatula.


2. Bake at 375 F for roughly 40 minutes, or until the cake springs back when pressed down. Remove from the oven and let cool upside down, balanced on top of a bottle.


3. After two hours, run a knife around the inside of the tube pan to loosen the cake, and carefully remove.

4. To garnish, sprinkle with confectioners sugar, spread with a lemon juice and confectioners sugar glaze, or frost with icing. Since this cake is so light I opted for the more decadent choice and frosted the top.


Enjoy!!

Friday, January 28, 2011

Celeriac and Lentil Soup

As I mentioned in my previous entry, it’s a bit snowy in New England. The greater Boston area is suffering from mound upon mound of snow piled anywhere there's space. With snow in the prediction for tonight and a bit next week, it seems the snow is here to stay.

There’s less snow up in Vermont, but I assure you, it’s pretty darn cold. Most mornings are below zero, and it's considered a warm day when the temperature rises to double digits. This makes going outside a major production. In addition to a winter jacket, you need multiple sweaters, spandex pants under regular pants, knee socks, boots, neck warmers, scarfs, hats, glove liners, gloves, hand warmers, toe warmers, personal space heaters....

Sometimes it's easier to stay inside.


But when you absolutely must exit your home to brave the elements and waddle in all your layers through blinding snow, it's nice to have a warm bowl of soup waiting upon your return.

How about some nice hot celeriac and lentil soup?


You're probably thinking, ewww, lentils. But I assure you this is not your typical puke green, lumpy lentil soup. This lentil soup benefits form the addition of celeriac, or celery root. The celeriac lightens up the soup and imparts a fresh flavor to the lentils, lifting them from their mushy reputation.

This was the first time I cooked with celeriac. It’s certainly one ugly vegetable.


A trick to working with celeriac is use a sharp knife to peel through its tough skin. I spent a good fifteen minutes attacking it at different angles with my vegetable peeler, and the only surface that felt the sharp blade of the peeler was my fingers. A sharp knife gets right through the skin, so toss your wimpy peeler aside.


The soup is great with crème fraiche and fresh chive on top. If you need some meat with your soup, sprinkle some smoky bacon on top or serve with a maple apple sausage. Yum!


Celeriac and Lentil Soup.

Recipe adapted from The French Women Don’t Get Fat Cookbook by Mireille Guiliano

1 tablespoon olive oil
1 yellow onion
1 small celeriac
1 ¼ cups dried green lentils
6 cups chicken stock
salt and pepper to taste
red wine vinegar to taste
fresh chives (optional garnish)
crème fraiche (optional garnish)

1. Heat the olive oil in a large pot over medium heat. Meanwhile peel and slice the onion into thin rounds, then cut the rounds into quarters. Add the onion to the pot and cook until softened, roughly 5 minutes.

2. Meanwhile peel and chop the celeriac into roughly 1 inch cubes. Add the celeriac, split peas and stock to the pot. Bring to a boil, then cover and simmer for roughly 25 minutes until the lentils and celeriac are tender.

3. Puree the soup in a blender or food processor until smooth. Return to the pot and add salt, pepper and a drizzle of red wine vinegar to taste. (I usually start with about 2 teaspoons of vinegar then add more if needed)

4. Serve hot with a spoonful of crème fraiche and sprinkling of chopped fresh chive.


Stay Warm!

Thursday, January 27, 2011

Rustic Country Loaf, version 2.0

If you’re reading this blog from New England, you’ve probably experienced a touch of snow these past few weeks. And by touch, I mean several feet. It's certainly been a long and snowy winter, and I'm counting down until the first day of spring. In the meantime, I've been cooking batch after batch of hearty soup to keep warm.

French Onion Soup. Celeriac and Pear Soup. Creamy Beet Soup. Potato-Leek Soup. Celeriac and Lentil Soup. Roasted Winter Vegetable Soup. Cream of Celery Soup. Roasted Tomato Soup.

Accompaniments have been anything from oyster crackers to pomegranate seeds to whipped creme fraiche with chives.

But really. What goes better with hot soup than fresh hot bread, smeared in butter?


So, once again, I bring you bread.

Previously, I baked a country loaf with two types of flour: all-purpose flour and bread flour. This new country loaf contains three types of flour: bread flour, whole-wheat flour and rye flour. I’ve never baked with rye or whole-wheat flour before, and I was curious about the differences between these new flours.

Let’s start with the basics.


Flour is the ground, sifted meal of a variety of grains. Some grains are termed “hard” while others “soft”. Regardless, each individual grain contains bran, germ and starchy endosperm, but not all flours contain all components. Whole-wheat flour contains all three parts, giving it an extraction rate of 100% - it contains all of the available meal in the grain. White flour only contains about 72% of the available meal as it excludes the bran and the germ.

Flour also differs by the method it is ground. Steal-ground flour is crushed with giant steel rollers. This process generates a large quantity of heat, which strips away the wheat germ and all the vitamins and enzymes within the germ. Therefore US and UK laws require the flour to be enriched.

Stone-ground flour is crushed with two slowly moving stones. This process doesn’t strip away vitamins and minerals, producing a more nutritional flour that doesn’t require enrichment.

A third difference is sifting. After milling, flour is sifted different amounts to produce different textures ranging from powder fine to thick and course. This is important to consider as the texture of the flour greatly effects the texture of the end product. That’s why super fine cake flour is used to bake tender cakes and pastries.

A fourth difference is bleaching. The purpose of flour bleaching is mostly aesthetic. Bleaching flour is just like bleaching any other material- it creates a pure white flour. This is desirable when baking an item you wish you to be pure white. However, bleaching agents also degrade some proteins in the flour and even produce a bitter aftertaste. It's usually best to bake with an un-bleached flour.

On final difference between flours is gluten content. Gluten is the protein found in the wheat seed, and the amount varies between grain varieties. Gluten is responsible for giving dough its elasticity and ability to rise. Therefore, it's important have a flour with a high gluten content if you wish to create a light and airy loaf.


Here’s a look at the four flours I baked with recently:

All-purpose flour is your standard baking flour. It contains a mixture of high-gluten wheat and low-gluten, excluding the bran and what germ. All-purpose flour is bleached or un-bleached.

Bread flour is an un-bleached flour containing hard-gluten wheat and a small amount of malted barley, which improves yeast activity. Due to its high content of gluten, it is used in yeasted breads to create a stretchy dough and a light loaf by trapping a large amount of air as the dough rises .

Whole-wheat flour contains the germ from the grains, which imparts more flavor, nutrition and fiber to the flour. It also contains more fat, which means it is subject to going rancid, and should therefore be stored in the fridge to prevent spoilage.

Rye Flour is milled from a grass cereal and contains far less gluten than all-purpose or whole-wheat flour. Therefore rye flour doesn’t produce a well-risen airy loaf unless high-gluten flour is added to the dough. Rye flour is commonly used to bake sourdough and pumpernickel breads.


And now you know a little more about different flour types commonly used in bread, and I’m ready to get on with this second rustic country bread! This recipe is adapted from Baking Illustrated, and it produces one large, round loaf.

Starter:
½ teaspoon instant dry yeast
1 cup water, room temp
1 cup bread flour
1 cup whole-what flour

Dough:
3 ½ cups bread flour
½ cup rye flour
1 1/3 cups water, room temp
2 tablespoons honey
2 teaspoons salt

To make the starter:
1. Dissolve the yeast in the water in a medium bowl. Add the flours and mix until a stiff dough is achieved. Cover with plastic wrap and leave at room temperature for at least 5 hours, or preferably overnight.


To make the dough:
1. In the bowl of an electric mixer, add the flours, water, sponge and honey. With the dough hook, knead the dough at lowest speed until the dough is smooth, roughly 15 minutes. Add the salt in the final 3 minutes.


2. Transfer the dough to a large oiled bowl and cover with plastic wrap. Let sit at room temp for 2 hours or until the dough is tripled in size.


3. Lightly flour your work surface and turn the dough out. Gather the dough into a smooth ball by pulling the dough from the sides and gathering at the bottom. Place the dough smooth side down in a large colander lined with a well-dusted tea towel. Leave for one hour, or until the dough is doubled in size.

4. Meanwhile place an oven rack in the lower middle part of the oven and place a baking stone/sheet on the rack. Place an empty brownie pan on the rack directly below. Preheat the oven to 450 degrees F.

5. Cover the back of a large baking sheet with parchment paper and invert the dough onto this sheet. Remove the linen on top of the dough and cut a large X on top of the loaf with a razor blade.


6. Slide the dough and the parchment below off the baking tray onto the baking stone/tray in the oven. Pour three cups of water into the tray on the bottom. Bake about 35-40 minutes, until the loaf is browned and an instant read thermometer inserted into the bottom reads 210 degrees.

7. Turn the oven off and open the door, but leave the bread inside for an additional 10 minutes. Remove and cool the loaf on a cooling rack until room temperature, about 2 hours.


Enjoy!!

Monday, January 10, 2011

Rustic Country Loaf

“Making bread strikes a mysteriously prehistoric chord somewhere inside us… alongside the mental satisfaction, you discover new and different gastronomic pleasures that enrich you and those around you.”

Lionel Poilane
Guide de l’amateur de pain


Continuing on my recent exploration in the world of baking bread…

Previously, I baked a rustic Italian bread, and it was just about as rustic as bread gets if you use the number of ingredients as a measure of simplicity. The results were delicious and satisfying, and it got me wondering about processed bread in the grocery store.

When people visit their local bakery and buy a loaf of bread, it was undoubtedly baked that morning. They don’t buy bread baked the previous morning, and they certainly don’t buy bread from last week. Everyone knows fresh bread goes stale quickly. The next day you make croutons, french toast, breadcrumbs or bread pudding with the leftovers, and they’re all delicious.

So what’s in grocery store bread that keeps it soft and supple for weeks?

Highly processed bread in the grocery stores utilizes a process called Activated Dough Development (ADD) or Chorleywood Bread Process (CBP). Both these processes produce a light, voluminous loaf quickly and cheaply. It’s achieved with extra ingredients and intense energy.

So what exactly is in that processed bread you bought last week? Let’s take a closer look at the ingredients in processed bread.

Flour- Flour is present in bread as the source of carbohydrates, protein, vitamins and minerals. Different varieties include all-purpose flour, bread flour, whole-wheat flour, rye flour, potato flour, etc.

Water- Water is the glue in bread, binding the flour into dough.

Salt- Salt adds flavor to bread as well as aids in attracting water, which enhances bread texture and inhibits mold.

Yeast- Yeast aerates the dough and adds flavor.

Now for the unexpected ingredients.

Bleach- Some flours are bleached using chlorine dioxide gas to whiten the flour. Bleach adds no flavor, texture or nutrition to bread, and it’s banned in some countries. Most flour companies sell all-purpose un-bleached flour.

Reducing Agents – Reducing agents (commonly cysteine) are added to some breads to create a stretchier dough and improve bread texture. They have no nutritional benefit.

Emulsifiers- A wide range of emulsifiers are added to bread to increase the amount the dough rises and thus create a larger, airier loaf. They also have no nutritional benefit.

Preservatives – Preservatives such as calcium propionate are added to dough to increase shelf life. They’re also suspected carcinogens.

Enzymes – Enzymes are the most interesting and widespread additive in processed bread. They have a wide range of functions from improving flavors and colors to increasing bread tolerance during packaging. Enzymes are protein catalysts that speed up chemical reactions. They are used up in each reaction they aid, so they technically don't exist in the end product. Bread producers aren't required to list enzymes with ingredients. Sneaky. Most of them are genetically altered, and they have no nutritional value.


Yuck! I’m sticking with my own bread!

This loaf contains two types of flour instead of one, bringing the ingredient count up from four to five. The recipe is adapted from Flour by Joanne Chang, one of the many cookbooks I received for Christmas (thanks, Mom!). It yields two medium-sized loaves of bread.


Starter Ingredients:
¾ cup water, room temp
1 ¼ cups all-purpose flour
¼ teaspoon active dry yeast

Dough Ingredients:
1 ½ cups water, room temp
2 cups all-purpose flour, plus 2 tablespoons
2 cups bread flour
Starter
¼ teaspoon active dry yeast
2 teaspoons kosher salt
1 teaspoon sugar
2 tablespoons yellow cornmeal

To make the starter:
1. Mix the water, yeast and 1 cup of the all-purpose flour together in a medium bowl. Cover and leave to rest in a warm place for 5-8 hours.

2. Add the remaining ¼ cup of all-purpose flour and stir until incorporated. Cover and place in the refrigerator overnight.

To make the bread:
1. Remove the starter from the fridge and allow to come to room temp while you prepare the bread.

2. Combine the water, all-purpose flour (just the two cups) and bread flour in the bowl of an electric mixer. With the dough hook, run the mixer at low speed for 1 minute until the flours have combined and soaked up the water. Cover the bowl and let sit 10 minutes.


3. Uncover the bowl and add the starter, yeast, sugar and salt, and mix on medium-low speed for 4 minutes until everything is combined evenly.

4. Grease a large bowl and place the dough in the bowl. Cover with a damp tea towel and let sit in a warm place for 2-3 hours. The dough will not rise significantly, but rather will feel more relaxed.


5. Line a baking sheet with parchment paper and sprinkle with the cornmeal.

6. Divide the dough into two, using a food scale if you have one for an exact division. Shape each ball of dough into a round loaf and place on the prepared baking sheet. Cover the sheet with plastic wrap and allow to rest for 2-3 hours, until the dough is yet again more relaxed.


7. Preheat the oven to 500 F. Sprinkle each loaf with 1 tablespoon of all-purpose flour. Using a razor blade or knife, slash the loaves, about ½ inch deep.


8. Bake the loaves for approximately 35 minutes. Watch closely as the tops may begin to brown and may need to be covered with foil around 20-25 minutes into baking.

9. Remove the loaves from the oven and set on a cooling rack until room temperature. Although, if you’re anything like me, you’ll immediately grab a serrated knife and butter!


Enjoy the bread within 2-3 days of baking. Store in a paper bag to keep the crust nice and crisp.

Up next: a country loaf with three types of flour and honey in additional to the basics.

Rustic Italian Bread

Simple things in life are greatly under appreciated. A cold glass of water is pretty much as banal as it gets, but drink that glass of water after running outside in hot summer weather. It becomes the most refreshing thing you’ve drank for ages. It's the same with the wimpy bag of chips they hand out at the end of marathons. They look so wrinkled and sad, but trust me, the salt tantalizes your taste buds and the chips melt in your mouth as if you were tasting a dish at a five star restaurant.

Seemingly simple foods all have their time and place even though they're often overlooked. If I had to survive on just one simple food item, it would definitely be a warm loaf of bread, fresh from the oven, smeared with french butter. Okay, that’s two food items. But there's really nothing more satisfying than warm bread coated in butter. Screw those low carb diets. This is a classic and delicious combination of food, yet so simple that restaurants often supply dinners with free bread and butter in the same manner they supply the tap water.

So how can you improve this delicious combination without ruining its simplicity?

Bake the bread yourself.

Even though bread is so basic, containing just flour, yeast, salt and water in the simplest of loaves, people rarely bake their own bread. People prefer buying freshly baked loaves from their local bakery and commonly sacrifice taste and texture for the packaged bread cluttering grocery store aisles.

When you bake your own bread, you feel a sense of pride and ownership over your bread that only comes from chaperoning the dough from start to finish. You become attached while you're kneading the dough in your hands, watching it rise slowly in the oiled bowl, delicately shaping the loaves and sitting on the floor by the oven door watching them bake though the tiny window. All the while the yeasty aroma begins to dance through the air awakening your senses of the delights to come.

My specialty breads are brioche and cinnamon-raisin bread, but I wanted to try my hand at baking a crusty, rustic loaf. I wanted to bake a bread using the minimal four ingredients required. I started with the Rustic Italian Loaf from Baking Illustrated. I was curious to see what results such minimal ingredients would produce. Here's my adaptation of the recipe, which yields one very large and very delicious loaf of bread.

Starter Ingredients:
2 cups bread flour
¼ teaspoon active dry yeast
1 cup water, room temp

Dough Ingredients:
3 cups bread flour
1 teaspoon active dry yeast
1 1/3 cups water, room temp
2 teaspoon table salt


To make the starter:
1. Combine the flour, yeast and water in the bowl of an electric mixer. With the dough hook, knead at the lowest speed until all ingredients come together, about 3 minutes. Transfer to another bowl and cover with plastic wrap. Let the starter rest for 3 hours at room temp, then store in the fridge for 8-24 hours.


To make the dough:
1. Let the starter come to room temp while you prepare the dough. Place the flour, yeast and salt in the bowl of an electric mixer and knead with the dough hook on the slowest speed until the ingredients come together, about 3 minutes. Cover with plastic wrap and let sit at room temp for 20 minutes.

2. Remove the plastic wrap and add the starter and salt. Knead at lowest speed until the dough and starter are mixed together, about 4 minutes. Increase the speed to medium-low and mix for one more minute while the dough comes together into a ball.

3. Transfer the dough into a large oiled bowl and cover with plastic wrap. Let the dough sit at room temp for one hour.

4. Remove the plastic wrap and fold the dough in the following manner: grab one side of the dough and fold it into the center of the mound of the dough, then do the same on the other side of the dough. Repeat this perpendicular to the first folds. You will end up with a square-ish shape of dough. Replace the plastic wrap and let sit another hour.


5. After one hour repeat the folding process described above and let sit another hour.

6. Dust your work surface with flour and place the dough on the surface. Roughly form the dough into a 8 x 10 inch square using your hands. Now shape the loaf following these instructions: fold the top right corner of the dough into the center, followed by the top left corner. Gently roll the dough from this pointed top and continue rolling until a log is formed and the seam is on the bottom. Transfer the loaf onto a baking sheet lined with parchment paper. Dust the loaf with flour and cover with plastic wrap, then let the loaf rest for an additional hour.


7. Preheat the oven to 500 degrees F and place a baking stone (or baking sheet if you don’t have one) into the oven. Using a razor blade, cut a slit along the top of the loaf leaving about ½ inch on each end of the loaf. Spray the loaf with a small amount of water then slide onto the baking stone/sheet in the oven.


8. Bake at 500 degrees F for 10 minutes, then reduce the temp to 400 degrees F and bake an additional 35 minutes. After about fifteen minutes of baking at 400 degrees F, cover the loaf with aluminum foil to prevent to exterior from browning too much.

9. Remove from the oven and place on a cooling rack. Don't cut into the bread until it has cooled about two hours, but if you're like me you won't wait. If that's the case, then promptly smother in good butter and enjoy.


Coming up next- a rustic country loaf baked with two types of flour.

LinkWithin

Related Posts Plugin for WordPress, Blogger...