Monday, December 20, 2010

Busch de Noel

Christmas Countdown: Five Days!

Still unsure of your Christmas dessert? How about a Busch de Noel?

A Busch de Noel, or Yule Log, is a traditional Christmas cake. It consists of a chocolate cake coated with buttercream, then rolled up and decorated to resemble a log. As I was baking my Busch de Noel last week, I began to wonder how the tradition of a cake resembling a log came into being.

Apparently, the Busch de Noel arose from an ancient celtic tradition for celebrating the winter solstice. On the solstice, the Celts would dearch for a large elm, cherry, beech or oak trunk to burn. The log was both a symbol of the suns rebirth as well as an offering of thanks to the sun for returning to the earth.


As this tradition evolved, the celebration became more elaborate. The logs were decorated in greenery and ribbons and the ashes were collected and saved for later use in curing illnesses and warding off the devil.


As time wore on and stoves came into popularity, the tradition still evolved. The former larger logs were replaced by smaller branches, which were set in the middle of dinner tables and surrounded by Christmas treats. This branch was eventually replaced by a cake resembling a log, and thus the Busch de Noel arose!

Thank goodness, as I'd much rather eat cake than go out hunting for a log!


The cake needs to be baked a day in advance to assembeling (and eating!). It sits overnight underneath a damp towel, which ensures a moist cake for easy rolling.


Ingredients:
7 medium eggs
7 oz semisweet chocolate
7 oz sugar
4 tablespoons raspberry jam
2 tablespoons chocolate liquor

1 ½ sticks unsalted butter, room temp
½ cup sugar
2 egg whites
2 oz unsweetened chocolate
2 oz semisweet chocolate

Powdered cocoa
Decorations

To prepare the Cake:
1. Grease a 9 x 13 inch brownie pan with butter. Line the greased pan with parchment paper and set aside. Preheat the oven to 350 F.

2. Chop and melt the 7 ounces of semisweet chocolate in a double broiler. Allow the melted chocolate to rest for five minutes while you prepare the eggs and sugar.


3. Separate the eggs. In an electric mixer, whisk the egg yolks with the sugar until pale and fluffy. In another bowl, whisk the egg whites until firm.

4. Fold the melted chocolate into the egg yolks and sugar just until combined. Then fold in roughly 1/3 of the whipped egg whites into the chocolate mixture. Add the remaining egg whites and fold until the whites are incorporated.

5. Pour the batter into the prepared pan and bake for 25-30 minutes, until firm. Remove from the oven and place on a cooling rack. Cover the cake with a damp towel and allow to sit overnight.

6. The next day, remove the towel from the cake. Sprinkle the cake with the chocolate liquor, then spread with the raspberry jam. The cake is now ready to be frosted and rolled!


To prepare the Chocolate Buttercream:
1. Chop and melt the 4 oz of chocolate in a double broiler. When melted, set aside and allow to rest for five minutes while you prepare the eggs and sugar.

2. Place the egg whites and sugar in the bowl of an electric mixer, and place this over a pot of simmering water. Place a candy thermometer in the bowl and continue to heat the sugar and eggs, while stirring occasionally, until the thermometer registers 160.

* If you don’t have a candy thermometer, don’t fret! You can heat the mixture until all the sugar has dissolved and the mixture is no longer grainy when rubbed against the side of the bowl.

3. Remove the bowl from the heat and place in the electric mixer. Whisk the egg whites and sugar on high speed until white in color and thick, roughly 8-10 minutes. It will be similar in consistency to marshmallow fluff.


4. Switch to the paddle attachment and add the soft butter in small chunks with the mixer running on medium-low. When all the butter is added, run the mixer for an additional 2-3 minutes.

5. Slowly pour in the melted chocolate into the buttercream, and fold until all the chocolate has been incorporated.


To assemble the Busch de Noel:
1. Spread roughly 2/3 of the chocolate buttercream on the cake, leaving a border of ½ inch uncovered around the cake.


2. Starting at the 9 inch side of the cake, roll! Don’t try to squeeze the cake too tight, just roll lightly, pulling pack the parchment as you go.

3. Use the remaining buttercream to coat the exterior of the cake. Use a fork to create bark-like lines in the frosting, and dust with powdered cocoa.

4. Decorate to your liking!!


Happy Baking!!!

Monday, December 6, 2010

Ginger People Houses

...Christmas is coming…
….the geese are getting fat…
….please put a penny in the old man’s hat…


It’s certainly starting to feel like Christmas! It's been snowing on and off this past week and everything is draped in a delicate white blanket. Christmas lights are twinkling on trees and in shop windows, and I've certainly been blasting the Christmas music while I cook.

Cloaked by all this Christmas glitz and cheer, I start planning Le Petit Lapin’s Christmas Dessert Menu last week. First item was ginger people and houses for them to live in.

This was my first attempt at making a gingerbread house. The more I pondered constructing an architecturally sound and stable house, the more nervous I became. Thankfully, my ginger house turned out great, and I've made several more since.

Below is my recipe for ginger dough. It can be used for both ginger people and ginger people houses. I am only going through the process of making a house seeing as it is a bit more work than people. However, if you use the dough to make ginger people, roll the dough slightly thinner and bake for 5 less minutes.

To make the outlines for the house, simply trace them in cardboard or thick paper and laminate. I used the following dimensions to create a house with a large, sloping roof, but you can certainly create your own shape. The more unique the better!

Roof = 9 x 10 inches
Side = 4 x 8 inches
Front/Back = 4 x 8.5 inches with triangle on top with sides of 9 inches on the 8.5 inch base


Ginger Dough:
3 ¼ cups all-purpose flour
1 tablespoon cocoa
5 teaspoons powdered ginger
2 teaspoons cinnamon
½ teaspoon ground clove
¼ teaspoon freshly grated nutmeg
½ teaspoon salt
1 ½ sticks unsalted butter
¾ cup sugar
¾ cup molasses


Additional Ingredients and Supplies:
Ginger House Outlines
Cardboard
Royal Icing
Canned Frosting
Pastry Bags or ziplock bags
Candy for decorating
Hard Hat…this is serious construction, people!


To make and bake the dough:
1. Sift the dry ingredients together in a medium sized bowl. In the bowl of an electric mixer, beat the butter and sugar until light and fluffy.

2. Pour the molasses into the butter mixture and mix until combined. Add the flour mixture in three parts, mixing only until all the ingredients come together.

3. Form the dough into three separate balls and wrap in plastic wrap. Chill in the fridge for at least 1 ½ hours and up to three days.

4. When ready to bake, preheat the oven to 350 F. Remove one piece of dough at a time, and roll out on a lightly floured surface to a thickness of about 1/4 inch.


5. Lay the house outline on top of the dough and cut along the outline. Push away the scraps and carefully lift the dough onto a baking sheet lined with parchment paper.


6. Bake the ginger house parts for 15 minutes. Allow to cool on the baking sheet for five minutes then transfer to a cooling rack to cool completely. Repeat for all surfaces of the house.

To assemble the Ginger House:

7. First make the royal icing. Simply combine a large amount of confectioners sugar (roughly 3 cups) with a small amount of boiling water (maybe 3 tablespoons). Mix together, and add more water or sugar until the mixture is thick and gooey.

8. Spoon the icing into a pastry bag fitted with a small tip, or pour into a zip-lock bag and cut a small corner off the bottom. Put some of the canned frosting in another pastry bag (or zip-lock bag) fitted with a larger tip.

9. First, use the royal icing to decorate any of the pieces. Don’t add candy yet, but if you want to pipe on doors, windows, and roofing, do this now and allow the icing to set.


10.Take your cardboard and mark with pencil where you wish to place the four bottom pieces of the house. Starting with the back face of the house, pipe royal icing over the penciled line several times. Place the gingerbread piece on this line and hold for a few minutes while the royal icing dries. You can also place something next to the piece to hold it up. Use your canned frosting on the inside of the house and pipe along the royal icing just as extra reinforcement.

11. Allow the back piece to dry for roughly ten minutes before you start with the other sides of the house. Once the first piece is dry, repeat the process with the two sides and front of the house.


11. Lastly, adhere the two roof pieces, one at a time. Use the royal icing to coat the two pointed sides of the front. Once you place the roof piece on, hold the piece for roughly five minutes. Afterward, place something below the roof to hold it up until the frosting is entirely dry. Repeat with the second roof piece only when the first piece is completely secured.


** If your roof piece doesn’t seem to stay in place first time, don’t give up!! Just remove and add more royal icing and try again. Mine slid away on my first attempt and held on my second, so just keep trying**

12. Now comes the fun part, decorating! Use either the royal icing or the canned frosting to decorate the house with candy. Have fun, and try not to eat too much candy while decorating!


Of course, you could always save yourself the trouble and purchase a Le Petit Lapin ginger people house!

Email Le.Petit.Lapin.Vt@gmail.com or call 802-253-5174 to order your ginger people house!

Thursday, November 18, 2010

Thanksgiving Pies!

Le Petit Lapin would love to provide your thanksgiving dessert!!

Orange-Pecan Pie $19.00


Pumpkin Spice Pie $17.00


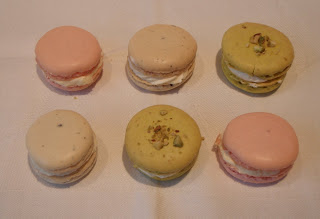
French Macaroons $1.25 each
Black Tea with Honey Buttercream
Pistachio with Vanilla Buttercream
Rose with Citrus Buttercream


The complete dessert list can be emailed...

...email Le.Petit.Lapin.Vt@gmail if you're interested!

Hunting Season Update...and Almond Pear and Almond Raspberry Tartlettes

If you read my earlier entry about biscotti, you might recall it’s hunting season up here in Vermont. Apparently that had been bow and arrow season, which I thought that was pretty bad. Unfortunately, it only gets worse from there.

This past weekend marked the beginning of rifle season. Lovely.

The other evening while eating a hot bowl of oatmeal for dinner, I noticed a pick-up truck slowly backing up on the road abutting my property. I then saw a man standing on the road by the truck, pointing a rifle towards the grassy area to the side of my house. I looked out the sunroom window to see a large group of deer right where his rifle was pointing.

Well, that’s not happening. I'm certainly not one for confrontation or getting in the way of men with guns, but there was no way I could sit there and allow this to happen. And what good are the police when they arrive after a deer has been killed? Heart pumping, I raced to the sunroom door. Standing on the step, I started banging the door nonstop until the deer ran back into the woods behind my house.

Huge victory for the deer and me!

That could have been the dumbest thing I ever did seeing as the hunter was standing there with a rifle. Luckily he promptly got back in his truck and drove away. Hopefully he realized he was lucky I didn't call the police seeing as he was breaking the law hunting on posted property.

Once I stopped shaking from all the excitement, I enjoyed an almond-pear tartlette left over from the Waterbury Winter market to celebrate my triumph over the hunter.

Of course, you can enjoy these tartlettes on any occasion. You can half the recipe and make less or double, triple, etc to feed a crowd. They’re delicious and beautiful, yet simple to bake.


Makes six 4 inch tartlettes.

Pastry:
1 ½ cups all-purpose flour
¼ cup sugar
1 stick sweet butter, ice cold
1 egg yolk
3-4 tablespoons heavy cream

Raspberry Tartlettes:
1 cup whole blanched almonds
1 cup white sugar
4 tablespoons unsalted butter
4 egg yolks
1 1/4 teaspoons vanilla
Raspberries, of course!

Pear Tartlettes:
1 cup whole blanched almonds
¾ cup confectioner’s sugar
¼ pound unsalted butter
½ teaspoon almond extract
1 egg
2 tablespoons all-purpose flour
Apricot jam
Canned pears – 2-3 cans


To make the pastry:

1. Sift the flour and sugar together in a bowl. Cut the butter into small chunks and work into the flour mixture with your hands until the mixture resembles breadcrumbs.

2. In another bowl, whisk together the egg yolk and 3 tablespoons of heavy cream. Pour this into the flour mixture and use your hands to thoroughly combine. If the dough is too dry to come together, add more heavy cream until the dough forms a ball.

3. Wrap the dough in plastic wrap and refrigerate 2-4 hours or overnight.

4. Remove the dough from the fridge and allow to warm up for 10-15 minutes. Sprinkle your work surface with flour. Divide the dough into 6 equal pieces and roll each out into a circle to fit the Tartlette pans. Be sure to press the dough down into the sides of the pan to avoid shrinkage during baking.


5. Place the prepared pastry shells into the fridge for roughly 30 minutes. Preheat the oven to 350 F (raspberry) or 375 F (pear). The raspberry tartlette shells are pre-baked before filling and baking again. The pear tartlette shells, however, are filled with jam, almond cream and pears before baking.

Almond Raspberry Tartlettes:

1. Line the chilled tart shells with aluminum foil and fill with baking beans. Bake the covered shells for 20 min. Remove the baking beans and foil and bake for an additional 5-8 minutes, until the shells become golden brown.


2. While the shells cool, prepare the almond cream. Grind the almonds to a fine powder in a food processor. Cream the butter and sugar in an electric mixture then add the almonds and mix to combine. Add the remaining ingredients and mix again until combined.


3. Divide the almond cream evenly among the six tart shells and spread out in the shell. Arrange the raspberries in concentric circles on top of the almond cream. Sprinkle each tart generously with white sugar, then place in the oven for 40 minutes until the almond cream is golden brown.


Almond Pear Tartlettes:

1. Remove the chilled tart shells from the fridge. Spread a generous tablespoon of apricot jam on the bottom of each shell.


2. Prepare the almond cream. Grind the almonds in a food processor to a fine consistency then add the powdered sugar and mix. Next, add the ice cold butter in small chunks and mix until well combined. Add the remaining ingredients and mix until thoroughly combined.


3. Divide the almond cream evenly among the shells and spread over the jam, being sure to cover all jam. Cut the pears into thin slices and arrange on top, entirely covering the almond cream. Bake at 375 F for roughly 50 minutes until the pears and pastry are golden.


4. Brush the cooled pear tarts with heated apricot jam to give their surface a beautiful glisten.


ENJOY!

Monday, November 8, 2010

Waterbury Winter Farmers' Market

The first winter farmers' market in Waterbury, VT is this Saturday the 13th!!


Located in the
Thatcher Brook Primary School from 10-2, there will be winter veggies, meat, eggs, dried flowers, plants, handmade artistian cards and prepared food. Oh, and there might be some delicious treats from Le Petit Lapin! So come and check it out and support local businesses!


In case you need more persuading to stop at the market, here’s a preview of the Le Petit Lapin Winter Market Menu:

Individual Orange-Pecan and Pumpkin Pies

White Chocolate, Dried Cherry and Cashew Cookies

Fresh Brioche

French Macaroons- Black Tea with Honey and Pistachio with Raspberry

Almond Pear and Chocolate Caramel Tartlettes

Slices of Maple-Walnut Layer Cake

Rosemary-Apricot Cookies

Crunchy Orange-Pecan Cookies

Iced Butter Cookies in Leaf Shapes

Fruity Granola

Butterscotch-Coconut Cookies

And of course Chocolate Chip Cookies for traditionalists.


Hope to see you there!!!

Friday, November 5, 2010

And then there was winter. And hunting season.

I’ve been so busy calling restaurants and sending out Thanksgiving Dessert Menus that I missed the memo about winter. The fall is over as the once beautiful and colorful leaves are all but shriveled brown wafts drifting through the woods. It’s been lightly snowing on and off every morning with morning temperatures in the 20s. The mountain has a fairly thick coating of snow on the trails and highest peaks, and I’m sure cars will soon be heading to the mountain toting skis on the roof.

Along with this chill also comes bow-season for the hunters. I went home to Massachusetts for a mere four days, and during this time hunters must have noticed the house was shut up and the cars gone. My neighbors spotted a van driving out of our driveway with a deer on the roof. This isn't the first time my house has been used as a shooting range for hunters.

Unfortunately, they aren’t breaking any laws. Hunters are allowed to hunt on any private property as long as there isn’t a no hunting or trespassing sign posted. I hadn’t put ours up yet, not realizing hunting season had begun. The signs are all up now, and the hunters haven't been back.

Unfortunately, hunters aren't all the deer must look out for. Last week I left the house for an early morning run only to come across a dead deer on my neighbors front lawn. Apparently it was hit by a car the previous night and dragged onto the grass. As if that wasn't enough, this very morning I came across an intact deer leg and a tangle of the rest of the deer by my mailbox. It must have met something hungry in the night.

Deer are such animals of grace and beauty, and it deeply saddens me to watch these natural yet unfortunate events happening right on my own property.


So, nothing like a hot cup of tea with crunchy biscotti to lift spirits and warm cold fingers and toes?? I think so.


Honey-Lavender Biscotti with White Chocolate Drizzle.

If you’ve ever ordered a cup of coffee or tea after dinner in an Italian restaurant, you’ve probably encountered biscotti. Biscotti are a twice-baked cookie, baked once in a log then sliced into long thin cookies and baked again to attain their infamous crunch. They beg to be dunked into your hot drink to soak up the liquid and soften their crunch.

The hardness of the biscotti depends on the fat content of the cookie. Biscotti baked with just egg whites create a hard and dry cookie. If butter is added, the cookies are softer and closer to the pre-packaged biscotti sold in grocery stores. Biscotti baked with whole eggs, and sometimes additional egg yolks, exhibit a medium level of crunch.

To bake these honey-lavender biscotti, make sure you use a good quality honey as it greatly improves the flavor. And if like most people, you don’t necessarily have dried lavender blossoms in your pantry, don’t panic. They’re fairly easy to find at gourmet food shops. I bought mine at Marty’s in Newton, MA, but they're also easy to find online.


Ingredients:
2 ¼ cups all-purpose flour
1 teaspoon baking powder
½ teaspoon baking soda
¼ teaspoon salt
2/3 cup sugar
3 eggs
3 ½ tablespoons good quality honey
¾ teaspoon vanilla extract
2 tablespoons orange zest
1 tablespoon dried lavender

1. Preheat the oven to 350 degrees F and line a baking sheet with parchment paper.

2. Sift the dry ingredients together.

3. In the bowl of an electric mixer combine eggs and sugar and whisk on high speed until the mixture reaches a pale yellow color. Add the honey, vanilla, orange zest and lavender and mix until just combined.

4. Turn the dough out onto a work surface and divide the mixture in two (use a food scale to be exact if you have one). Form each portion of dough into a 13 by 2 inch loaf.

5. Place each loaf on the prepared baking sheet, about 4 inches apart. Bake the loaves approximately 30 minutes, when they begin to turn golden brown and start to crack on the top surface.

6. Cool the loaves about 15 minutes and lower the oven to 325 degrees F.

7. Cut the loaves into ½ inch slices, cutting at a diagonal to elongate the biscotti. Lay the biscotti cut side up on the baking sheet and return to the oven, cooking approximately 7 minutes on each side, until the cookies are golden on each side.

8. Optional- If you’re like me and think chocolate makes everything in the world better, drizzle the cooled biscotti with melted white chocolate.


9. Enjoy! crunch crunch crunch

(images - honey: bbcfoodfood, lavender: squidoo.com)

Wednesday, October 27, 2010

Homemade Granola

Some things in life are easier to buy. The last time I tried to make caramels, I burnt the sugar and they were inedible. The second time I burnt the caramel, again. The third time they were runny.

It’s the same with fudge. It’s always grainy or lumpy or something just isn’t quite right. It’s a lot easier to visit the local candy shop, Laughing Moon Chocolates in Stowe. (although I’ve been experimenting with chocolate truffles and I prefer my own!)

This is not true for everything, however, and granola is certainly one of the exceptions. I’ve tried a range of granola from grocery stores and gourmet food shops, and it’s all the same. It’s hard and dry with hints of a cardboard or plastic aftertaste. And if it is slightly edible, it's thanks to all the added sugar and chemicals whose names I can't pronounce. Yuck! Isn't granola supposed to be healthy?

The only reason people put up with bad tasting granola is that many think granola is hard to make. Honestly, it couldn’t be simpler to bake, it tastes amazing, and it remains fresh for a long time.

I sold this granola at farmers’ markets this summer, and it was a very popular item. I’m currently shipping bags to customers in Massachusetts.

And now, you can make it for yourself!

Ingredients:

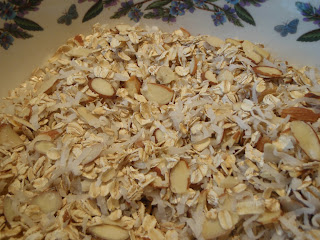
4 cups rolled oats
2 cups slivered almonds
2 cups sweetened shredded coconut
¾ cup vegetable oil
½ cup good-quality honey

1 cup dried apricots, diced
1 cup dried figs, diced
1 cup dried cranberries
1 cup unsalted cashews

1. Preheat the oven to 350 degrees F and line baking sheet with parchment paper.

2. Combine oats, almonds and coconut in a large bowl.


2. Wisk oil and honey together in another bowl then add to oat mixture.


3. Spread mixture evenly onto prepared baking sheet.


4. Bake for 40-45minutes, stirring every 15 minutes.


5. Cool then add dried fruit and cashews.


6. Enjoy!

Next entry...individual fruit tarts...yum yum!

LinkWithin

Related Posts Plugin for WordPress, Blogger...